I recently found the perfect bed frame at IKEA—or so I thought. I spotted it across the showroom floor: simple white, feminine shape, and IKEA-inexpensive. Then I came closer. The frame had massive carved tulips and hearts all over it! Shocked, slightly disgusted, and totally disappointed, we moved on to the next aisle. As Mike and I rounded the corner, I took one last look at the over-sized child’s bed and noticed it was smooth on the back. Hmmmm. What if we could built it inside out? No one would have to see the pre-school graffiti and we’d have the simple bed I thought it was. It was a gamble but we bought it and started building.
This was the frame as IKEA intended, with tulips and hearts displayed in all their glory.We assembled the frame so all the carvings face the mattress. We had to drill a few new holes to make this work, but it's nothing a bit of white paint can't fix.The headboard looks completely smooth and the mattress is thick enough to cover the footboard design.We pushed the bed against the wall and the tacky pattern is our little secret.
As promised, here is our hysterically homespun Christmas tree. For a base layer, we bought a few strands of colored balls at Jamali Garden but then we let our friends (adults, believe it or not) make the rest of the ornaments at our holiday party last weekend. We laid out computer paper, scissors, and ribbon by the tree and, before we knew it, snowflakes started to take shape. Like elementary school art class but with champagne, it was the perfect party activity.
In a few years, I’m sure well have built up an ornament collection with a few Waterfords, but in the name of good friends and the first Christmas in our new home, I’ll always keep a few computer paper snowflakes.
Of all our weekends doing house projects, nothing has fueled more productivity than our house warming last weekend. We sent out the Evite a month in advance and that party date acted as our deadline to wrap-up our half-finished DIY endeavors. A flurry of building, hanging, and cleaning ensued but the item we are most excited to have ticked off the list is undoubtedly the window frames.
I saw the idea to turn old windows into picture frames in Ty Pennington at Home last summer but never really thought about doing it, until I saw this rugged stack at our trip to the Old Country Store in Rhinebeck, NY. A set of them suddenly seemed like a quirky but efficient way to tame our massive photo collection.
We started the process of prepping the windows during out 48-hour furniture-refinishing weekend. Here, we taped up the windows to prevent the new coat of paint from dripping on the glass.
We sanded them down to help get off any grime and create a smooth surface for the paint to adhere to. Then we added a fresh coat of white and voilá, we had two 12-photo frames.
In digging through years of photos, we skipped over the posed shots and compiled our best collection of art, adventure, and laughs. We printed the pictures at home, cut them to size with a paper cutter, and taped them into each pane. We hung each on either side of our living room archway and they have made me smile every day since.
Flash back to three weeks ago and my backyard was a DIY testing ground for nine painted-furniture projects. The paint has since dried, the hardware been screwed back on, the bugs picked out of the air-dried paint, and the furniture has been moved inside. Some of the projects were just paint touch-ups and others, you’ll see, were a decorative overhaul.
(Above) This desk and mirror just needed a fresh coat of white paint. They go so nicely together, I think I’m going to buy a little stool for it and use the setup as a vanity in the master bedroom.
This antique beveled mirror was originally a natural wood color, but we painted it poppy red to match the wallpapered accent wall in our guest bedroom.
We loved this Macky Blue sideboard’s tin top and exposed tin bread drawers—despite its brutally chipping framework. We bought it knowing that, even with serious sanding, this piece couldn’t be smoothed over. So we vowed to try our best and chalk the remaining rough spots up to “character.”
Though the original paint job had a palette like a Greenbay Packer, the two-tone legs were really inspiring. We painted the piece plum but left the feet primer-white to match the tin top.
I still have dreams of having a tall chinoiserie china cabinet in my kitchen, but for $100 and a fun weekend project, this is a cute placeholder.
The greatest lesson I learned from Painted Furniture Weekend Part 1 was: NEVER strip furniture. It was the most disgusting, toxic, arduous yet deceptively easy project I’ve ever attempted for my home. The majority of the paint may gum up and peel off nicely, but the other 40% is a battle to get off the wood.
After stripping two sides of this piece, I abandoned ship and just went on to sand the front and top.
Note: Please ignore heinous boob tube TV on top of sideboard and ugly equipment below.
As you can see, our entertainment center is not ready, but we’d like to ultimately use this sideboard as a media console (when we buy a TV from the 21st century). To do this properly we’d take the top two drawers, cut off the fronts, and reapply them with hinges so they fold down for easy access to the DVD player and fold up to cover unsightly equipment.
 I recently found the perfect bed frame at IKEA—or so I thought. I spotted it across the showroom floor: simple white, feminine shape, and IKEA-inexpensive. Then I came closer. The frame had massive carved tulips and hearts all over it! Shocked, slightly disgusted, and totally disappointed, we moved on to the next aisle. As Mike and I rounded the corner, I took one last look at the over-sized child’s bed and noticed it was smooth on the back. Hmmmm. What if we could built it inside out? No one would have to see the pre-school graffiti and we’d have the simple bed I thought it was. It was a gamble but we bought it and started building.


 In a few years, I’m sure well have built up an ornament collection with a few Waterfords, but in the name of good friends and the first Christmas in our new home, I’ll always keep a few computer paper snowflakes.
 Of all our weekends doing house projects, nothing has fueled more productivity than our house warming last weekend. We sent out the Evite a month in advance and that party date acted as our deadline to wrap-up our half-finished DIY endeavors. A flurry of building, hanging, and cleaning ensued but the item we are most excited to have ticked off the list is undoubtedly the window frames.
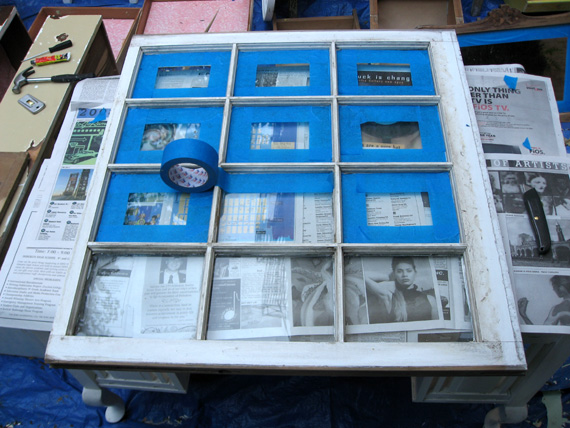
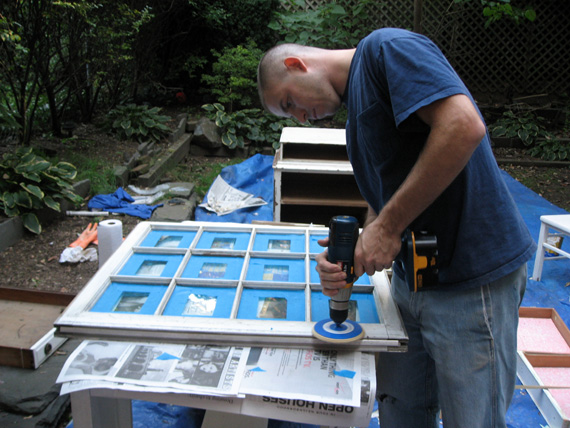
 In digging through years of photos, we skipped over the posed shots and compiled our best collection of art, adventure, and laughs. We printed the pictures at home, cut them to size with a paper cutter, and taped them into each pane. We hung each on either side of our living room archway and they have made me smile every day since.
 Flash back to three weeks ago and
  This antique beveled mirror was originally a natural wood color, but we painted it poppy red to match the wallpapered accent wall in our guest bedroom.
 We loved this
  Though the original paint job had a palette like a Greenbay Packer, the two-tone legs were really inspiring. We painted the piece plum but left the feet primer-white to match the tin top.
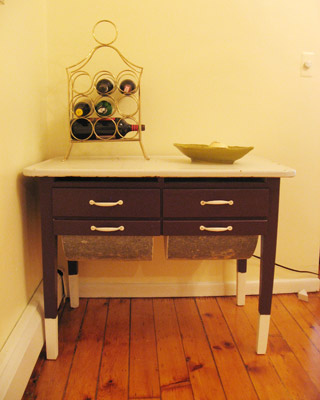 I still have dreams of having a tall chinoiserie china cabinet in my kitchen, but for $100 and a fun weekend project, this is a cute placeholder.
 The greatest lesson I learned from Painted Furniture Weekend Part 1 was: NEVER strip furniture. It was the most disgusting, toxic, arduous yet deceptively easy project I’ve ever attempted for my home. The majority of the paint may gum up and peel off nicely, but the other 40% is a battle to get off the wood.
 After stripping two sides of this piece, I abandoned ship and just went on to sand the front and top.